
Proper underground waterproofing is the basis of the construction. If you make a mistake in this section, you will significantly reduce the lifetime of the entire house.
What to avoid
Before you begin a waterproofing design of the house, take into account the following:
● kind of areas protected with the insulation foil,
● waterproofing stress of the given site,
● if you want the waterproofing in the structure to be accessible,
● if the waterproofing film you choose can be simply laid,
● and how much money you want to invest in waterproofing.
Consider all these questions carefully. This will help prevent future problems.
A suitable choice for both houses and industrial buildings is the PENEFOL® 750 and PENEFOL® 800 waterproofing insulation. These polyethylene foils are suitable against:
● rising moisture,
● flowing water,
● water under an external pressure,
● and even against running water.
In addition, PENEFOL® foil will be appreciated by all builders who look for quality at an affordable price.
The prescribed thickness of the waterproofing membrane is 1.0 - 2.0 mm according to the assumed load.
Another advantage of this insulation against earth humidity is simple and fast laying. Just roll the strips and weld them with hot air or hot wedge. If you place PENEFOL® in a vertical position, choose one of the following procedures:
1. laying on a pre-lined reinforcing masonry,
2. laying on brick-built basement walls with drainage protection of studded membranes.
The second approach is better if you want to have access to the membrane in the future.
The moisture insulating foil is laid between two layers of geotextile, which allow free stretching of the foil during the dilatation movements of the building structures. This ductility is another advantage of PENEFOL. Individual welds can be checked using a suitably selected inspection procedure.

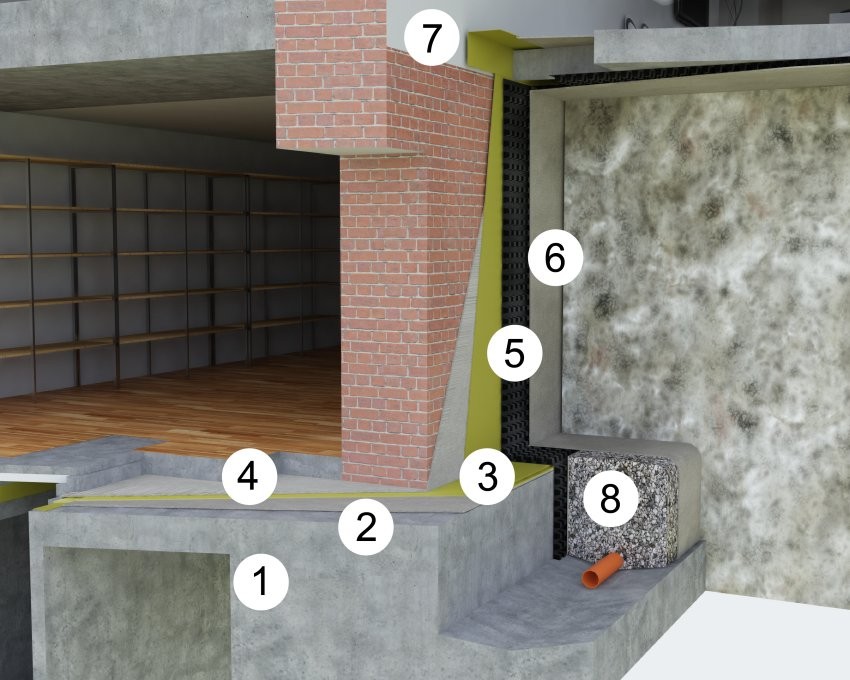
1. Leveled ground concrete is essential. The substrate must be free of any protrusions, dry mortars, or sharp edges that could damage the waterproofing foil.
2. IZOLTECH H 300 underlayer geotextile with overlap of 50mm placed freely is the following step.
3. Place freely the PENEFOL® 750 or PENEFOL® 800 waterproof insulation foil. The sheets are 100 mm folded and welded with single or double weld for better control. Use the PENEFOL® corner profile at the corners. All the details must be processed by manual welding and separate fittings.
4. The next layer is the geotextile IZOLTECH H 300 with 50 mm overlap which protects the waterproofing insulation from the other side.
5. The following step is the LITHOPLAST® SANA 15/0.8 or LITHOPLAST® INSTAL 20/1.0 protective foil that is loosely placed against the wall. If the depth of the membrane does not exceed the width of the studded membrane strip, place another strip horizontally along the building structure. If the drainage depth is higher than the studded membrane width, run it vertically downwards and align it with one row profile overlap. A double-sided adhesive butyl rubber tape of 15 mm is placed into the joint.
The studs are oriented out of the wall and in combination with IZOLTECH K 300 geotextile it forms a drainage gap for water outflow. Interlaced polyethylene PetexDren 400 net is used to increase the bearing capacity, mainly with LITHOPLAST® INSTAL 20/1.0.
If the studs point towards the wall, do not place the geotextile on the studded membrane. When backfilling, however, be cautious and remove sharp stones or use a fine aggregate fraction.
6. Anchoring of the membrane is performed at the highest point (150 mm above the planned ending at terrain level approx.). Alternatively, attach anchor to the horizontal foil. Never allow the waterproofing membrane to stand free from the wall. It could drain the rainwater beneath it. After setting of the refilled excavated soil, cut the membrane in the required height and perform the ending with an eaves board, or continue with the waterproofing membrane installation on the horizontal surface.
7. The drainage block (gravel fr 16-32) with a perforated drainage tube DN 100 with outlet in sewerage is the last step to be done. Everything packed in filtering geotextile IZOLTECH H 500.