Recovery of the wet masonry with studded membrane
Remediation with a studded membrane is a convenient alternative to expensive masonry cutting. It is suitable where the cutting is not possible or where the moisture damage is not so severe.
What to avoid
Water in the construction structures is always a problem. Therefore, it is not good to wait until more problems arise. A good and easy-to-use solution is a remediation with a studded membrane working on the principle of ventilation.
With the studded membrane you create an air cavity between the structures or between the wall and the ground. Therefore, the wall does not absorb moisture from the soil. The air flowing through the cavity and drains the vapor away. Thanks to this, the construction naturally dries out.
The studded membrane can be installed both vertically along the outer or inner side of the wall and horizontally in the floor structure. Ventilated cavities should be connected to the outside or inside environment via piping providing air inlet and outlet, or via a bar with a ventilation gap. Air still flows thanks to natural or artificially created elevation and temperature differences.
Recovery solution of the wet masonry with studded membrane
The main advantages of HDPE nylon foil LITHOPLAST® are:
● simple assembly,
● strength of material,
● easy division into smaller pieces,
● low transport costs,
● a choice of different stud sizes (creating larger or smaller ventilation gap).
The membrane is simply applied on the building structure and covered with excavated soil. You do not interfere with the building itself.
Recommended composition of wet masonry remediation
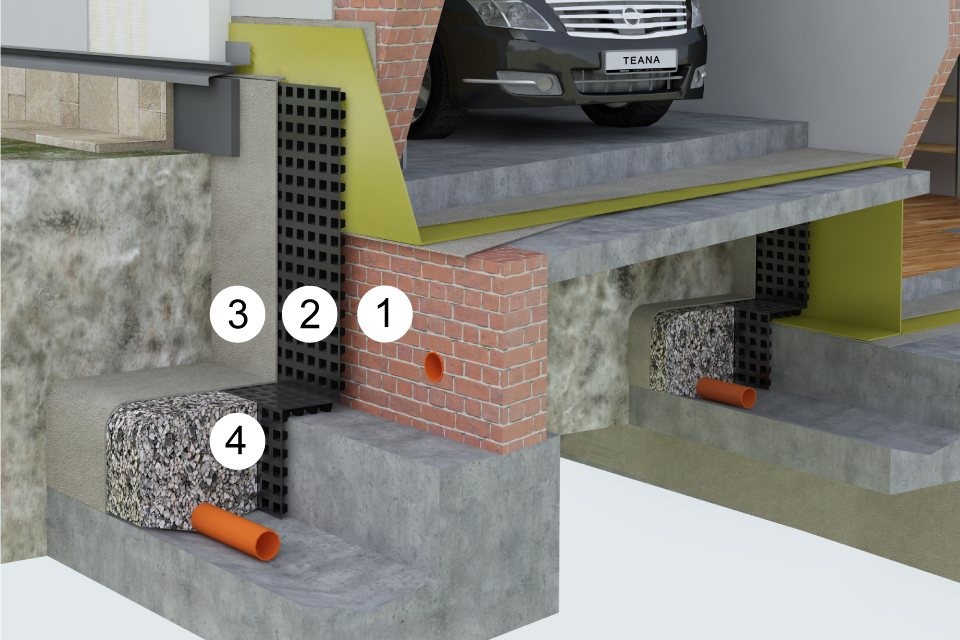
- Remove the soil that is adjacent to the outer wall. Thoroughly dig the hole to the base spill so that you do not disturb the statics of the house. If there is an important unevenness and sharp projections on the wall, use a redevelopment plaster to improve the wall. If you vent via the pipes, cut out the pockets in the wall. Place the ventilation tubes in them and plaster the system.
- The LITHOPLAST® SANA or LITHOPLAST® INSTAL studded membrane is then freely spread along the wall. If the depth of the membrane does not exceed the width of the studded membrane strip, place another strip horizontally. If the depth is greater, lower the rebated foil strips vertically and continue with an overlap of one row of profiles. Place a double-sided adhesive butyl rubber tape of 15 mm into the joint. The studs are oriented towards the wall and form an air gap.
- Cover the studded membrane with the IZOLTECH K 300 geotextile. If the LITHOPLAST® INSTAL plates are used, it is suitable to create a level foundation at the masonry footing (a concrete groove as a part of the drainage assembly), in order to place the plates on this foundation and connect them with industrial stapler. Anchoring of the membrane is performed at the highest point, ca. 150mm above the planned ending at terrain level. After setting the refilled excavated soil, cut the membrane in required height and perform ending with eave ventilation board.
- The gravel drainage block fr 16-32 with a perforated drainage tube DN 100 with outlet into a sewerage is the last step to be done. Wrap both the items with the IZOLTECH H 500 filter geotextile. This drainage prevents water from accumulating in the building structure and prevents it from entering the air gap.